Join me as I take you through what I think is the ultimate 4 week road-trip itinerary for the South Island of New Zealand. If you don’t have 4 weeks to explore, check out my condensed 2 weeks itinerary (coming soon!). This itinerary works best if you took the ferry from the North Island but can easily be modified for whichever location you start off at!
New Zealand has been on my bucket list since I saw pictures of its beautiful mountains, volcanos and glacial lakes. I just knew it was going to be the first place I went solo travelling. I was lucky enough to have 2 months exploring North and South Island but wanted to spend more time in South Island. Therefore, I decided to spend 3 weeks in North Island and 4 weeks in South Island. I believe this was enough time to see the highlights of both islands but with every location, there is always more to see! If you like this blog and want North Island road-trip advice too, check out my blog on 3 or 2 weeks in North Island.
While travelling South Island New Zealand, always follow the Leave No Trace rule (leave nothing but footprints) and show respect to the environment and the people too. In New Zealand they call this the Tiaki Promise which is a commitment to care for New Zealand, for now, and for future generations. By following the Tiaki Promise, you are making a commitment to act as a guardian, protecting and preserving their home.
I hope you found this New Zealand blog helpful and has made you excited for your next adventure! If you did, let me know in the comments and follow me on Facebook and Instagram.
Help Support My Blog
All my blogs and itineraries are and will be free to view. I have however, partnered with an affiliate site: GetYourGuide. If you found my blog helpful and want to book any tours on their website, please consider using the link in my posts. This won’t cost you a penny more than going direct with them but I get a small commission to help keep my blog up and running. Thank you for your support!
- North vs South Island
- Best Time to Visit New Zealand
- Car vs Public Transport
- Buying or Renting a Car?
- Can I travel to New Zealand on a Budget?
- Good To Know Before Visiting South Island
- 4 Week Overview
- Days 1: Picton
- Day 2: Nelson
- Days 2 – 4: Abel Tasman National Park
- Days 4- 6: Nelson Lakes National Park
- Days 6 – 7: Punakaiki
- Days 7 – 9: Arthur's Pass
- Days 9 – 11: Franz Josef
- Days 11 – 14: Wānaka
- Days 14 – 17: Queenstown & Glenorchy
- Days 17 – 19: Te Anau
- Days 19 – 22: Catlins National Park
- Days 22 – 24: Mount Cook National Park
- Days 24 – 25: Akaroa
- Days 25 – 27: Kaikōura
- Days 28: Christchurch
- Other Options
- Got More Time – Check Out These Places:
North vs South Island
Best Time to Visit New Zealand
Summer is peak season in New Zealand: December, January and February as the weather is warmer but things book up fast.Try to book in advance, car and accommodation prices also tend to be more expensive.
The Autumn months of New Zealand are March, April and May is still quite warm (especially the north island) but there are less people around so prices tend to be slightly less expensive and accommodation less competitive.
Winter in New Zealand spans June, July and August are the best time for snow sports, but holding off until July and August will mean more snow is around.
In Spring: September, October and November the weather is warming up, days are getting longer and flowers are staring to bloom. There tends to be more rain around but conditions are still great for hiking as it’s not too warm.
It just depends what sort of adventures you are planning on doing in New Zealand. The sun is a lot more intense than what I am use to with UV getting up to an index of 14 so bring suncream if you are going in summer!
Car vs Public Transport
The main question I had while trying to keep costs down and being more sustainable in my travelling was whether New Zealand could be explored on public transport (Kiwi Experience or Intercity buses). I did not know much about these buses before I left, however, having spoken to people on my trip I learnt that while Kiwi Experience is good for seeing the highlights and meeting new people, if you have a small social battery like me you might struggle being with a group the whole time. You can, however, decide to spend longer in one location as long as you book onto the next bus that comes through.
With the Intercity buses (New Zealand’s public buses), you have more flexibility about where you want to go and how long you want to stay, but some of the places may have a long wait between buses or you may struggle getting to the more remote places.
Personally, I chose to get a car as I would have much more independence then if I went by public transport. It’s also a lot easier for hikers as you can park right next to the trails and have a lot more flexibility with timings.
Another option is buying or hiring a van which follows similar rules to the decision of hiring a car. It is generally more expensive for solo travellers, they are less fuel efficient than cars (most of the hire cars are hybrid) but you save money on accommodation. You can also park in any of the scenic lookout points for food or a cup of tea/ coffee and take in the amazing scenery of New Zealand!
Buying or Renting a Car?
If you have decided that travelling New Zealand by car is the best option for you, the next question is whether to buy or rent. It is definitely cheaper to buy a car and then resell but you have to make sure that the car is in good working condition, get out private insurance and be prepared to spend a few days trying to find a car and then selling it.
For the amount of time I was travelling, I found it easier and less time constrictive to hire a car. This means I know the car is in good working order and I won’t have to search for a car online. Be aware that most car hire companies charge a lot of money for returning to a different location and some don’t allow you to take it over the ferry so make sure you check with your company.
Due to New Zealand being classed as a safe country, there is also the option of hitchhiking. I spoke to some hitchhikers that said the maximum amount of time they had to wait was 20 minutes before someone picked them up which is not long at all! Having said this, if you are a solo female backpacker like me, I don’t recommend this method as you never know what kind of driver will be picking you up. Always follow caution (this goes for every aspect of your trip)!
Can I travel to New Zealand on a Budget?
While New Zealand isn’t the cheapest country to go to due to high import rate of commodities and goods, it is still possible to keep costs down by staying in hostels and cooking your own meals. Also, as I am from England, I found fuel to generally be a lot cheaper in New Zealand than the UK.
Good To Know Before Visiting South Island
Sandflies!! These are one of the worst biting insects, are an absolute pain and seem to be everywhere. The best repellant I could find was from a brand called Okarito, made in the West Coast where the sandflies are the worst. The repellant is made of citronella oil and sweet almond oil and so smells really nice.
4 Week Overview
- Day 1: Picton
- Days 1 – 2: Nelson
- Day 2 – 4: Tākaka & Abel Tasman NP
- Days 4 – 6: Nelson Lakes NP
- Days 6 – 7: Punakaiki
- Days 7 – 9: Arthur’s Pass
- Days 9 – 11: Franz Josef Glacier
- Days 11 – 14: Wānaka
- Days 14 – 17: Queenstown & Glenorchy
- Days 17 – 19: Te Anau
- Days 19 – 22: Catlins NP (Oamaru)
- Days 22 – 24: Mt Cook & Lake Tekapo
- Days 24 – 25: Akaroa
- Days 25 – 27: Kaikōura
- Day 28: Christchurch
Days 1: Picton
Picton to Nelson -> 2hrs
I started my South Island adventure by taking the 2am ferry from Wellington to Picton using Bluebridge (Cook Strait Ferries). This was the cheapest fare on the website but got a few weird looks at the hostel when I started taking the bed sheets off my bed at 11pm. If you took this ferry in the winter months, then the sunrise as you approach South Island would be insane! As it turned out, I arrived before sunrise but the stars from the top deck were amazing.
When you arrive in Picton, you can either spend some time exploring the town or drive to Nelson following the Queen Charlotte Drive road. When I arrived everything was shut and it was still dark so I chose to head to Nelson straight away. The Queen Charlotte Drive follows the coastline for the majority of the drive, therefore, the views along the way are incredible. They obviously knew this when they built the road so there are loads of lookout points/ pull-over spots en route for you to stop and take in the scenery.
My favourite viewpoints of note are:
- Cullen Point Lookout which is a 20mins loop
- Cable Bay – head on up to the viewpoint bench at the top of the neighbouring hill for an amazing picture opportunity
- Pelorus Bridge Scenic Reserve – this one is a 45mins walk along a gorge and features your first taste of the famous swing bridges they have scattered all around the Island.
There are loads of accommodation in Nelson, however, a friend of mine stayed at the Bridge Backpackers in 2024 and they had bedbugs so check the reviews before you go. I found with quite a few hostels that the place could have high ratings but people would give 5 stars and then a bad comment, so read some of the comments before booking.


Day 2: Nelson
Nelson to Tākaka -> 1hr 40mins
Start your day with a walk along Tahunanui Beach, this is beautiful and has views across the sea of the hills in Abel Tasman National Park. If you’ve got time, check out Queen’s Gardens in the city centre, before grabbing some food for the journey.
You are heading into Abel Tasman National Park which is one of the most amazing places I visited in New Zealand! You have a choice whether you want to stay in the National Park itself, Kaiteriteri, which is a seaside town right on the beach and close to the water taxi I will talk about in a minute. Or Tākaka which is further inland but means you can squeeze in a trip to Farewell Spit, Cape Farewell and Wharariki Beach (home to the classic Window’s desktop background) when you leave on day 4. I chose to stay in Tākaka but you have to drive on a very windy road on a steep cliff to get there and back to the water taxi.
Wherever you decide to stay there are a few places on the drive to Abel Tasman National Park which you should definitely stop off at. The first of these stops is Riuwaka Resurgence. This is a beautiful 20mins walk in a native forest following a crystal clear river until you get to a cave at the end of the trail. At the base of the cave is the resurgence (reappearance of water from underground), which is known as Te Puna o Riuwaka by local Māori, and is considered sacred. Traditionally, Māori would not eat or swim at this sacred site, so please be respectful when you visit and don’t swim in the waters.
A stunning short spot is Hawkes Lookout Walk which follows a short walk to a viewing platform that overlooks the valley and river you just visited. There are also examples of rock formations and sink holes which portray the formation of Tākaka Hill. If you have time, a one minute drive away is Ngarua Caves, which is a series of limestone cave with stalagmites and stalactites and even has a skeleton of an extent Moa bird, tickets cost $30 for adults.
The last stop is Te Waikoropupu Springs, right next to the town of Tākaka. This place was breath taking! As described by the DOC website these springs are New Zealand’s largest freshwater springs, the largest cold water springs in the southern hemisphere and they contain some of the clearest water ever measured. For the first two, I’ll take their word for it but I can definitely vouch for its crystal clear water. The visibility was insane. As with the Riuwaka Resurgence, this spring holds deep cultural and spiritual importance so please treat it with respect. In order to keep the water at a pristine quality, do not touch the water as this can introduce contaminants into the water that may ruin the quality.


Days 2 – 4: Abel Tasman National Park
There are loads of things to do in Abel Tasman National Park: kayaking, sunbathing on the golden sand, swimming in the sea or hiking to see the best views from above. I loved this national park so whatever you chose to do will be an incredible adventure. I decided to get a feel for South Island hiking. I got a one way water taxi from Marahau North with Abel Tasman AquaTaxi to Anchorage Bay ($54 per adult with fees included) and then walked back to my car following the coastal path. This took me around 5hrs to complete as I took the detour to Cleopatra’s Pool and got lost a little bit so read the map they give you carefully! I would say Cleopatra’s Pool was kinda cool if you wanted to go swimming but otherwise it isn’t the most beautiful pool you will come across on this trip, so feel free to skip. Another hiking option is to take the water taxi to Bark Bay and walk back, however, this adds another couple of hours to the walk so if you wanted to swim in the sea, you might not have much time.
The great thing with Abel Tasman AquaTaxi was that it took us on a slight detour to Split Apple Rock, which was on my list to try and see. We also went past a NZ Fur Seal colony so make sure you have your camera out as they are likely to be sunbathing on the rocks or swimming in the sea.
Travel to Nelson Lakes National Park in the morning of day 4
Tākaka to Murchison via Cape Farewell-> 4hrs 30mins
Kaiteriteri to Murchison (missing out Cape Farewell) -> 2hrs
If you stayed in Tākaka and wanted to head up north to Farewell Spit/ Cape Farewell and Wharariki Beach, or want to see some natural rock “sculptures”, head to Labyrinth Rocks. This is a free place to visit and maintained by a local so any donations are appreciated for its upkeep. It’s a small attraction but you can spend as much time as you want looking for additional sculptures to the ones they have highlighted on the map. This place was pretty cool but some of the sculptures need a bit of imagination.
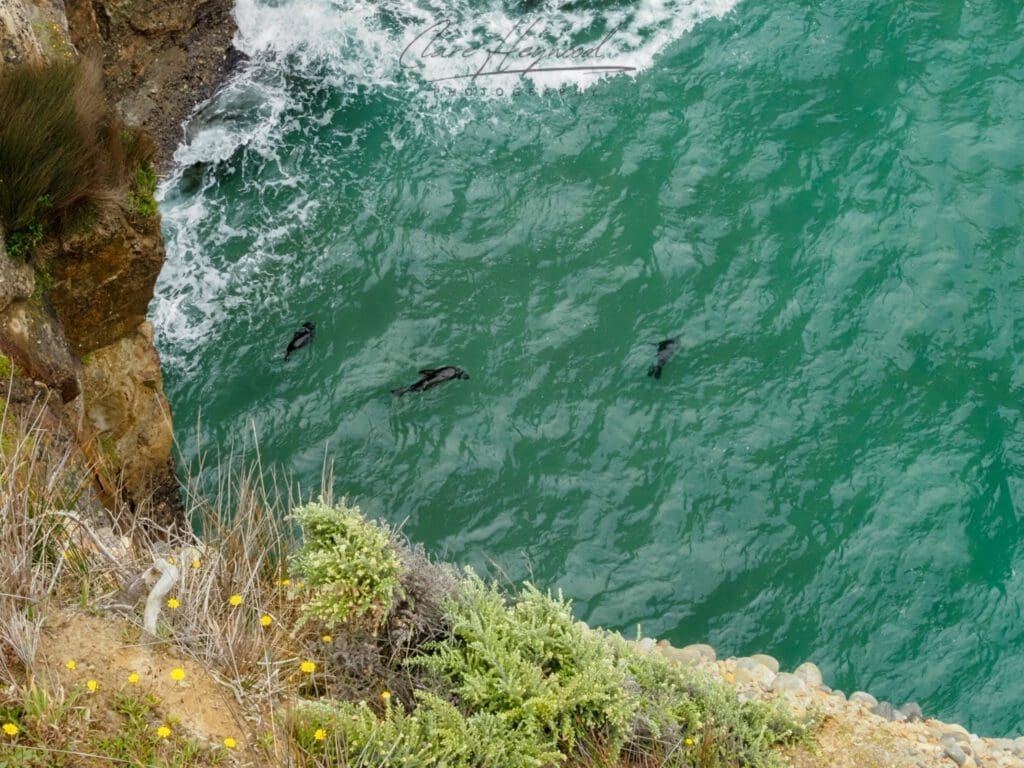
The parking to Farewell Spit is right next to the beach (Triangle Flat Car Park) and is a quick stop if you just want to get some pictures and be on your way. If you wanted a little walk, there is a track that goes to Fossil Point (no Fossils unfortunately) through a farmers field which is a beach where seals are usually seen in the water.
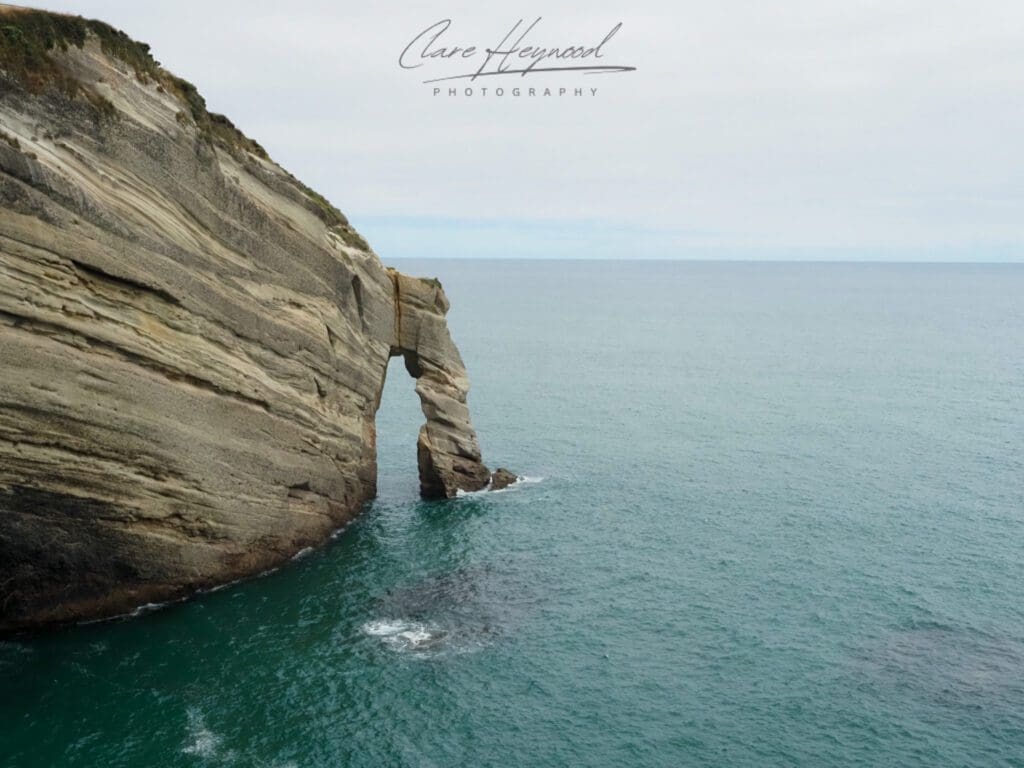
From here head to Cape Farewell which is a gorgeous rock outcrop with an archway at the end. If you are lucky you may see seals playing in the sea below you or whales further out in the distance. This is also the Northernmost Point of the South Island. Be aware that you have to drive down a 5km gravel road to get to the car park but my Toyota Yaris was fine, just make sure you drive carefully and slowly to avoid damaging the car, especially if its a rental.
I then drove to Wharaiki Beach which is another stunning beach and a 20mins walk from the car park. There are a few archway island dotted around the shoreline which have featured in the Window’s 10 Lock Screen. There are also some caves to explore at low tide and a pool where NZ Fur Seal pups can be seen playing.
I decided to stay in Murchison while exploring Nelson Lakes National Park as it was slightly cheaper but is a 45mins drive to Lake Rotoiti. This is a lesser known national park but I thought it was absolutely stunning! I will talk about it more underneath.


Days 4- 6: Nelson Lakes National Park
I was blown away by this place, it was the first time on my trip seeing big mountains and a couple of snow capped mountains, it’s safe to say I was so excited driving down the road to Lake Rotoiti! First thing you should do is go to the Jetty, the views from the car are insane!
There are a couple of hikes I suggest you do here, the first being Mt Robson. This is a 5hrs hike, starting off really steep but then levelling off once you get to the top of the mountain. I decided to start at on the Pinchgut Track, which begins at Mt Robert Car Park and you zig-zag up the cliff face for 1hr 30mins before getting to the top, and returned on Paddy’s Track. The views from the top, ascending and descending are stunning, you always have an amazing view of Lake Rotoiti and the surrounding mountains no matter which part of the walk you are on. There is a relax shelter at the halfway point just before you carry on with the loop which is perfect for lunch. Just after the relax shelter there is an option to carry on and do a a multi-day hike (Angelus Hut) but this is extremely remote so only go this way if you have prepped for the full walk as there is no water or service on this route.
The other walk is Whiskey Falls which follows the lakeside track. This walk follows the bottom of the mountain alongside the lake until you get to the waterfall. It takes around 5hrs for this hike and again, the views along the way are insane!
Another waterfall close to Murchison is Maruia Falls, a 5min walk from the car park.
Travel to Punakaiki on day 6
Murchison to Punakaiki -> 2hrs
There isn’t any official stops on this route but there are a couple of lookout spots which are located by the road signs.


Days 6 – 7: Punakaiki
There are quite a lot of 2-3 day or half-day hikes to do around here but most people just travel to see the pancake rocks. If you want to do this and spend longer in some of the other National Parks you could leave Murchison early on day 6, see the main attraction and then carry on to Arthur’s Pass. I did however, start doing the half-day hike having only found the trail after midday and so only walked to the viewpoint. I wish I had found it sooner to walk more of the route because it was stunning and so peaceful.
The main attraction here is the Pancake Rocks and Blowhole Walk. This is a 20mins return walk that follows a limestone landscape of pancake-shaped rock formations, surge pools and everyone’s favourite blowholes! Its a really beautiful walk and the rocks really do look like pancakes.
Another options is the Truman Track Beach, which is a walk through a subtropical forest and then emerges onto a platform overlooking the coastline. You can access the beach at low tide to check out the waterfall.
My personal recommendation is the Pororari Loop, which is a 3hr return hike which follows the Pororari River Track and then the southern part of the in-land track. I walked a little way on the river track and wish I had longer to carry on the walk. If you don’t fancy 3hrs, you can just do the Pororari River Track which is 1hr 30mins return.
Lastly, Punakaiki Beach is a really nice beach and perfect for watching the sunset. Beware of the sandflies though as they are pretty intense around the West Coast area.
I stayed in the Punakaiki Beach Camp right next to the beach which was a perfect location. They do have rooms to stay in but I slept one night in my car (booked for a tent site) as they were fully booked. The facilities were nice and clean and they had a coffee truck in the morning that sold hot food in the afternoon which was a really nice touch. My only problem was that they didn’t provide any cooking items in the kitchen, you have to hire it from reception. They didn’t tell me this at booking or check-in and when I went to cook, reception was already closed.
Travel to Arthur’s Pass on day 7
Punakaiki to Arthur’s Pass-> 2hrs


Days 7 – 9: Arthur’s Pass
There’s so much hiking to do at Arthur’s Pass, from short day walks to 8hr hikes to multi-day hikes staying in some of New Zealand’s best tramping huts. These huts are amazing for hiking far into nature and still having a shelter to stay in. They come in all different capacities with some housing 2/4 people and others over 30. Some also have wood fires which is great for the colder nights or trying to dry your socks off after attempting river crossings. Always check on the DOC website to help plan routes, find out if you can pre-book or if it’s first come first serve and you pay when you get there (for the up-keep of these amazing facilities). Sometimes you’ll need to bring tents in summer in case they are full by the time you get there. Most don’t have clean water either so pack a Jetboil or any water boiler for food and water.
For this itinerary though, unless you spent less time in Punakaiki, you won’t have time for a multi-day hike. You will however, have enough time to do the 8hr Avalanche Peak hike. This was a walk I really wanted to do but due to the weather conditions it wasn’t safe to do so, only attempt this hike in clear dry conditions. Plan well in advance and check the DOC website for detailed track advice and what to bring. The views look incredible but it is challenging and fairly dangerous so please be sensible.
Bealey Spur Track is a 3hr return hike that is fairly easy compared to some of the other hikes you’ll come across. That doesn’t mean to say that the views are not incredible and constant once you get past the tree line. I walked all the way to the Bealey Spur Hut (one of the oldest and most creepy) but there wasn’t much to look at once you got there so I turned back pretty soon after getting to the hut.
A shorter 1hr return walk to Devil’s Punchbowl Waterfall is another option. This route crosses a glacial lake before heading up a lot of stairs to reach the falls and it’s so worth it! It’s 131m high and is so mesmerising to watch, I couldn’t look away.
Finally, there is Castle Hill or Kura Tāwhiti, which is a 20min accessible track that takes you up close to huge limestone outcrops. This place was really cool and holds huge special significance for the local Māori so please reframe from writing your name in the rocks. This place is quite big for climbers but they tend to go on the smaller rocks lower down the hill.
A 5min drive from this attraction is the Cave Stream Scenic Reserve. This consists of a limestone cave which when there has been no rain you are able to walk the whole length of the cave. This is a super cool experience but make sure you are well prepared with touches, warm clothes and suitable footwear. Only attempt this with low water levels and it’s best to go with other people. I couldn’t find anyone to do it with me so had to miss out. I’ve heard it’s a must-do though if you can brave the cold and the two waterfalls you have to climb up. Remember if you feel like you can’t climb up them or get too cold, you can always turn back around.
Travel to Franz Josef on day 9
Arthur’s Pass to Franz Josef -> 3hrs 15mins
On your way to Franz Josef stop off at Hokitika Gorge. This is usually an amazing turquoise colour due to the glacial water that flows through it. Unfortunately, it had rained just before I got there and so it was more of a grey colour but still a really nice 1hr walk. Here is the perfect place to get yourself some of the famous pounamu, New Zealand jade or greenstone, for you or your family. Traditionally in Māori culture, pounamu should not be carved or bought for yourself, it was a gift from the land and should always be a gift between people. It is up to you whether you want to carry on this tradition, luckily I had already been gifted one from my friend so I bought some for my family.
There is also an incredible sandwich shop called The Hokitika Sandwich Company – West Coast which I highly recommend for lunch.


Days 9 – 11: Franz Josef
The weather in Franz Josef was awful the whole time I was there and I get the feeling you’re very lucky if its sunny.
If the sun was shinning the one walk I really wanted to do was Alex’s Knob Track, again, for this one you need the conditions to be sunny and dry. Unfortunately, I had to give it a miss but there was still plenty to keep me entertained. Alex’s Knob is an 8hr hike that is strenuous and steep but you get the best views of Franz Josef Glacier without taking a helicopter. Start the hike early to avoid the clouds in the afternoon. A similar hike but with a view from the other side of the glacial valley is Roberts Point Track – 5hrs 30mins. The view from here isn’t as good but is a good option if you want a slightly shorter walk. Don’t attempt this walk in rainy weather as there is a river crossing and there are rocks that can be slippery even on the best of days.
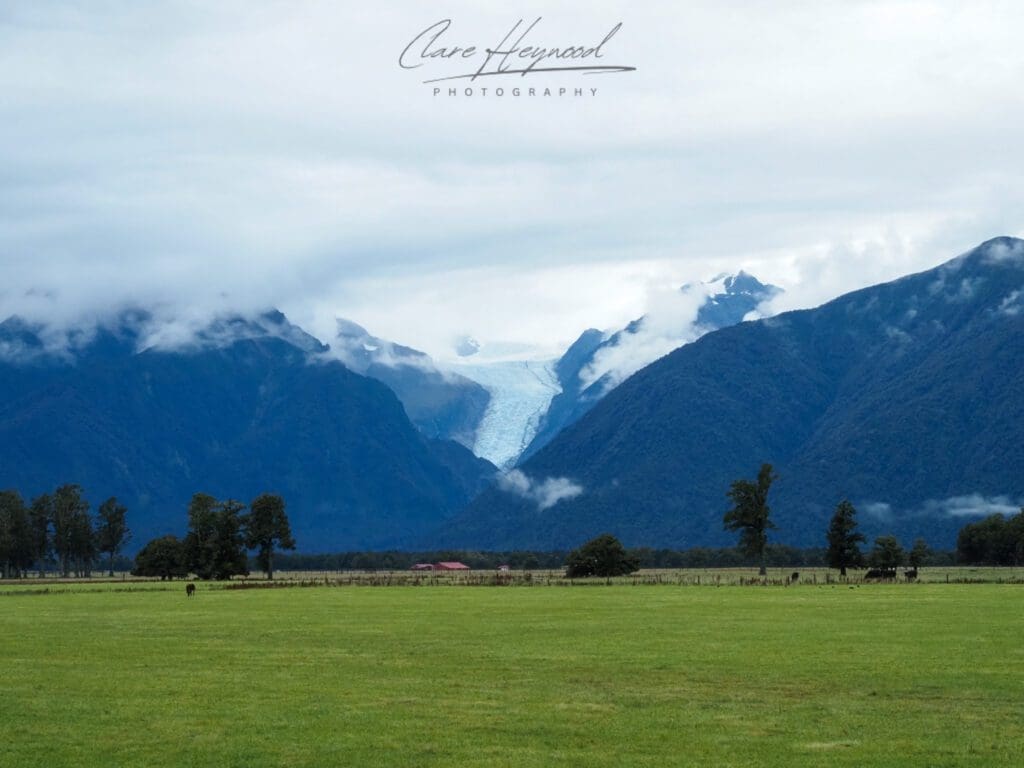
The likelihood is that it might be too rainy or cloudy to do these two tracks but you can still get a good view of the glacier a 10mins walk from the Franz Josef Glacier Car Park.
Another glacier is Fox Glacier which you can see either on the 2hr return Fox Glacier Southside Walk or the Fox Glacier Viewpoint from the car. My favourite was the 1hr 30mins lakeside walk on Lake Matheson where you can see Mount Tasman and Mount Cook reflected in the still lake alongside a glimpse of Fox Glacier. When conditions are right, you get an amazing mirrored view in the lake.
Travel to Wānaka on day 11
Franz Josef to Wānaka -> 4hrs
This is a long drive but there are plenty of amazing spots to stop off at. The first being Knights Point Lookout which is a short stop with a toilet block but with incredible views down to the shore below.
The next section has loads of little stops that are quite close together. Roaring Billy Waterfall is the first one you will stop at after passing Haast and entering the Mount Aspiring National Park. It’s a 25min return bush walk to a waterfall on the other side of a glacial river but is worth the stop.
Next is Thunder Creek Waterfall which a 5min bush walk to a beautiful waterfall. The sandflies love this place so put on your repellent before leaving the car, you’ll thank me later.
After Thunder Creek, stop at Fantail Falls, another 5min return bush walk to a waterfall.
The next stop is Blue Pools, unfortunately, this track was closed when I tried to go but from other peoples pictures it looks insane. It’s a 1hr return walk to a glacial lake that looks super blue and clear. If the track is still closed, there are two camp sites nearby where you can pull over, have lunch and take in the views. The next part of the journey is going to blow you away.
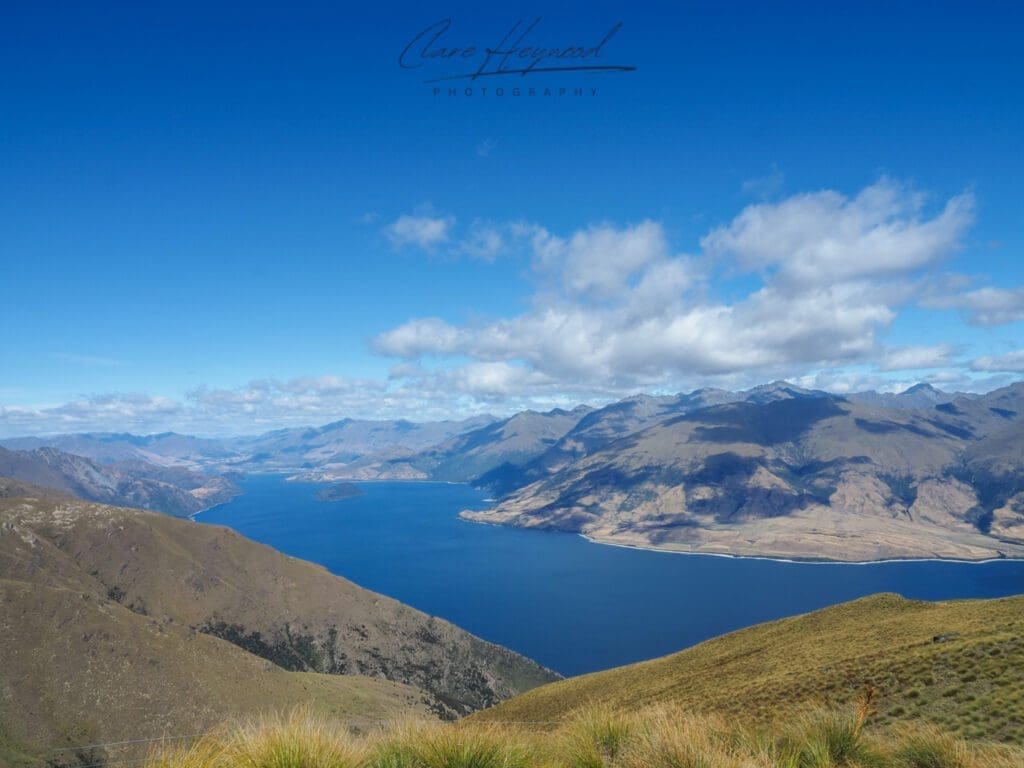
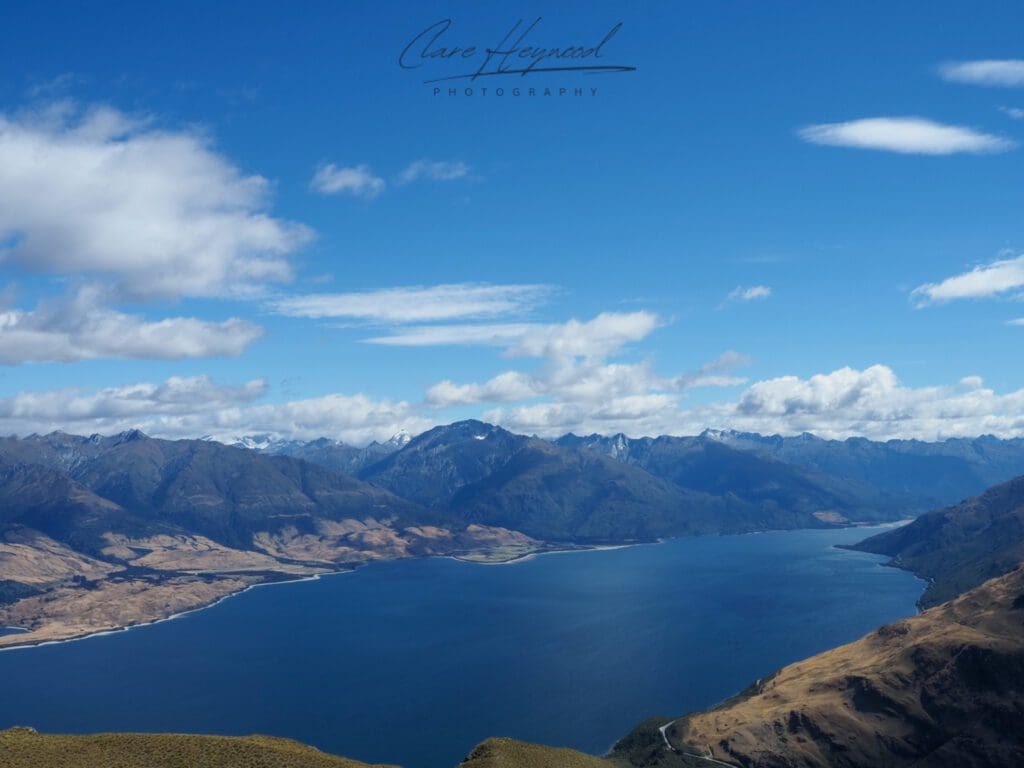
After turning the corner from Blue Pools car park, the view opens up to the mountains surrounding Lake Wānaka and after 10mins you get the first glimpse of Lake Wānaka itself. Carry on further down the road and you turn another corner onto Lake Hāwea and the view somehow gets better! This lake is more sheltered and so it looks incredible with the mountains as a backdrop. It was on this drive I finally understood how amazing South Island was going to be!


Days 11 – 14: Wānaka
Some people say there’s not much to do in Wānaka but I strongly disagree, I loved it here and preferred it to Queenstown. The view from the lake is breathtaking and you can walk along the lake to see That Wānaka Tree which was made famous on social media awhile ago. In summer, the tree is not submerged in the water and so doesn’t look as impressive but the backdrop makes up for it. I saw a few people climbing the tree for the best picture but this damages the tree and ruins it for future generations so please don’t touch it.
A great way to soak in all that Wānaka’s landscapes have to offer is to grab a kayak from the many companies along the lake and paddle across the lake.
There are three walks I would recommend while you are here. The first is the famous sunrise hike of Roy’s Peak. You might not want to wake up at 3am and trek up a mountain in the cold but trust me it’s so worth it! You could always go during the day but you can’t beat the colours of a sunrise or sunset. The walk takes about 5hrs in total but the hike to the summit is slightly quicker walk up as it’s dark so not much to see other than the stars if you’re lucky. Spend some time at the top soaking in the views but the best view is around the back, not looking at the town of Wānaka. This is where the colours of sunrise/ sunset hit the snowcapped mountains and it’s breath taking. The walk down is hard on the knees and took me slightly longer as I was taking pictures the whole way down.
My favourite hike during the day was Isthmus Peak. Not many people do this hike so it’s quiet but the views are constant the whole way up. At the summit you get 360 views of Mount Aspiring Mountain Range and both Lake Wānaka and Lake Hāwea. It takes between 5/ 6hrs depending if you have done Roy’s Peak the day before or not but is slightly less steep. I really recommend this hike, it was one of my favourites in the whole of New Zealand.
The last hike is Rob Roy Glacier Track and takes about 3-4hrs to complete. I couldn’t do this hike as its down a 30km gravel road and only recommended for 4×4 vehicles. There is a shuttle that picks you up from Wānaka but was very expensive for a return ride. Having said all this, if you find someone with a 4×4 vehicle this hike gives you the best views of a glacier you will see in the whole of New Zealand and best of all the incline is gradual. You will probably come across some Keas, which are inquisitive birds that love to steal your food or open backpacks.
Bremner Bay and Glendhu Bay are great locations that give a different angle to the Mount Aspiring Mountain Range and are usually quieter than the lakeside beach.
A nice walk is in Albert Town and follows Lake Wānaka Outlet, the water is super turquoise as the lake is glacial and if the sun hits it right, the colours are gorgeous.
Travel to Queenstown on day 14
Wānaka to Queenstown -> 1hr
Before you potentially jump out of an aeroplane or do a bungee jump there are a few stops between these two amazing towns which are worth pulling over for. The first is Crown Range Lookout, this gives you amazing views of Crown Range and overlooks Queenstown very far in the distance.
The other spot is Arrowtown which is an old gold mining town nestled in the valley of the mountains and is kept in pristine condition. It is really beautiful here and a great place to explore at lunchtime after you grab some food from the high street. If you want to spend slightly longer exploring nature there are plenty of hikes or bike trails to follow.


Days 14 – 17: Queenstown & Glenorchy
Welcome to the adventure capital of the world, I hope you are looking for adrenaline! Oh and traffic and a lack of affordable parking. If you are lucky you might be able to grab a free spot on Lake Esplanade road if you are there first thing in the morning or after 3pm once the midday rush has gone down.
Before we get onto what adrenaline junkie sports there are to do, I’ll talk about the hikes first:
- Queenstown Hill – a 3hr hike with less elevation than the other hikes but the views of The Remarkable Range (features in LOTRs) and Lake Wakatipu are unbeatable
- Ben Lomond – you can either walk just to the saddle (5hr return following the Tiki Trail from Queenstown) or all the way to the summit (6-8hr return from Tiki Trail). If you are going to the summit, the trail goes onto private land and is unmaintained, therefore, as I was hiking by myself, I only went to the saddle. You can also shorten the hike to 3-4hrs if you take the gondola up to the trail start. The views going up are insane, especially once you get to the saddle and the Crown Range opens up in front of you.
- Lake Alta (another LOTRs film set) – you have to pay $14 to access the road that takes you to this location as it is a private skiing route in winter and takes you directly up The Remarkable Range. The views of Queenstown and the surrounding mountains as you drive up are incredible, just that along was worth the money. Once you get to the car park, the last 10km of the road is unsealed but was fine for my Toyota Yaris, follow the markers all the way to the gorgeous mirror lake, Lake Alta. This was so pretty and the perfect place to have a picnic to enjoy the view.
- Lake Hayes – less a hike and more like a gentle walk around a lake. The views were still really pretty and with the correct conditions you get a perfect reflection of the mountains in the lake. It’s also a perfect place for birdwatching and having a relaxing picnic.
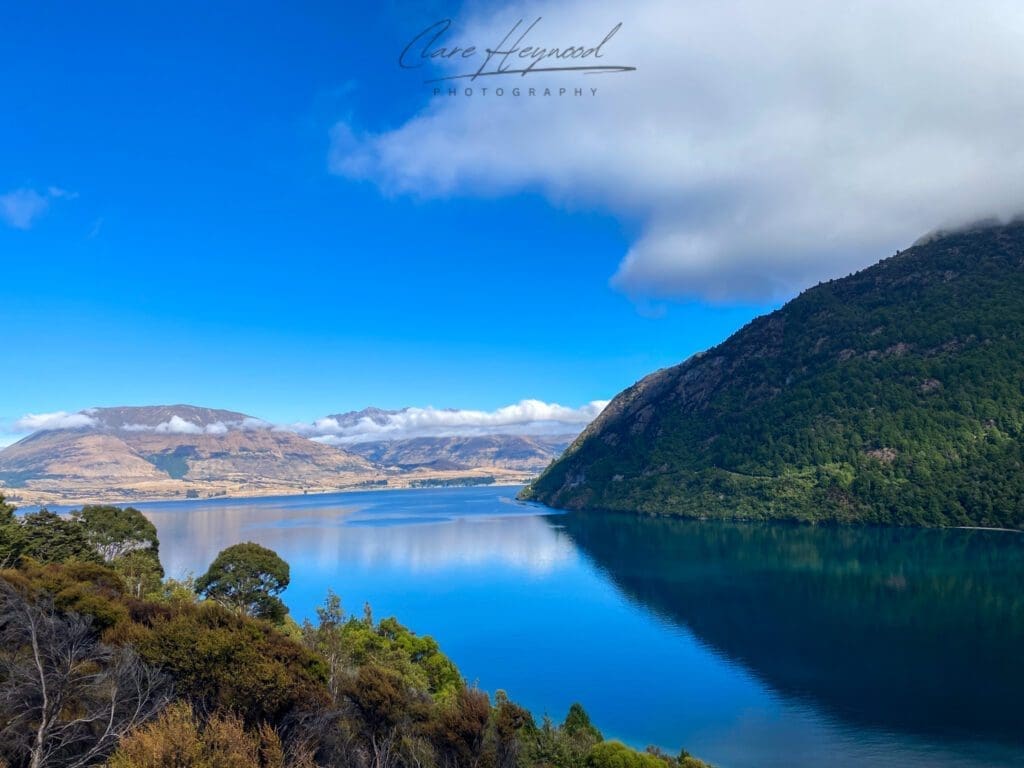
One trip I highly recommend is to Glenorchy. Even if you only have time to drive there you will not be disappointed! It’s without doubt the most picturesque road I have ever driven down. On the way to Glenorchy stop off at Bob’s Cove for incredible clear water and amazing views of the mountains from Bob’s Cove Viewpoint. Next stop at Bennett’s Bluff Lookout for insane views and your first peak at Mount Earnshaw (Isengard in LOTRs) and the glacier on top. For a better view of Mount Earnshaw there’s another stop called ‘Great view of glacier’ on Google Maps. Walk down to the shoreline for the best pictures. Once in Glenorchy, there’s plenty of things to keep you occupied:
- Head down to the beach and the famous wharf
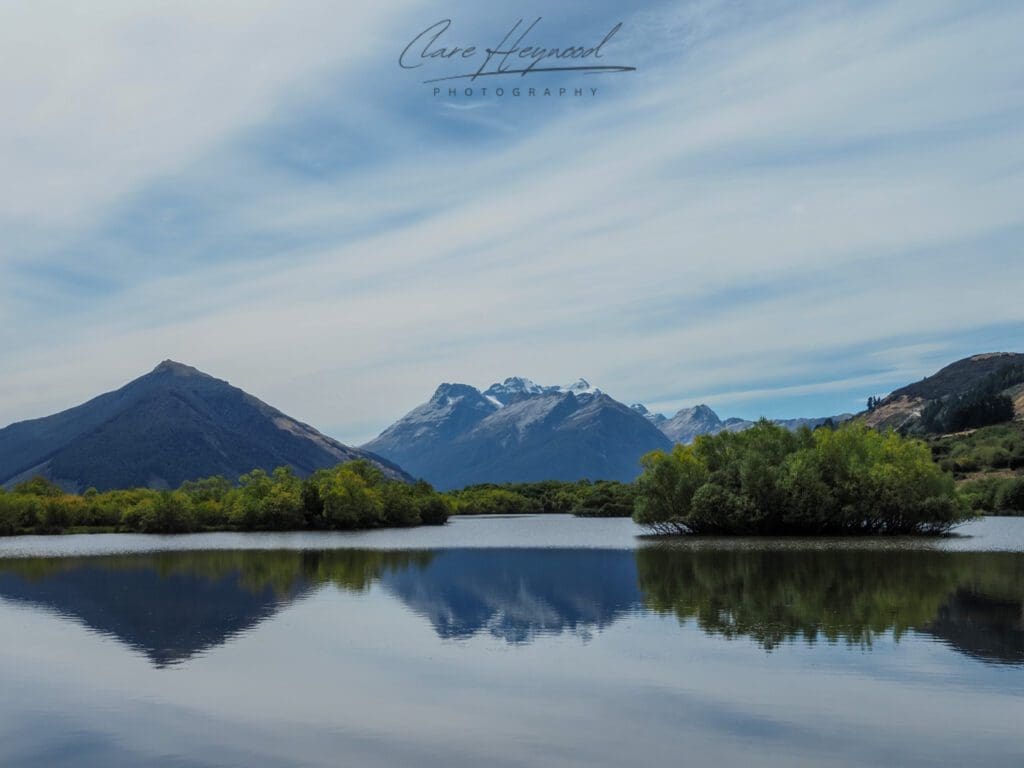
- Walk around Glenorchy Lagoon on the Glenorchy Walkway and stop at Glenorchy Lagoon Lookout for amazing reflections of Mount Earnshaw in the lagoon
- Walk the start of the Routeburn track but this is down a 9km gravel road which was incredibly bumpy when I went down
If you still need another place to stop off on the way back to Queenstown, Wilson Bay Reserve is another great place and is incredibly peaceful due to it being a sheltered bay.
Finally, when in Queenstown, there’s all sorts of adrenaline activities to do including skydiving, paragliding and bungee jumping. I did my bungee jump with AJ Hackett and I would highly recommend them. My jump was the Kawarau Bridge Bungy, the original one, at 43m over a gorgeous glacial river (much better than the one I did in London over a car park). It had rained the day before so was a lot more green than it normally would be, but I wasn’t paying much attention before I jumped. You can also do a Nevis Bridge at 134m but the backdrop isn’t as picturesque. The same company also do catapults, swings and ziplines if jumping isn’t your thing.
Catch the sunset on Queenstown Bay Beach or the Queenstown Gardens for a quieter experience. The vibe on the Marine Parade by the beach is great in the evening, you can watch the sunset and listen to a live pianist or witness a silent DJ set while eating an ice cream from Patagonia Ice Creamery, yes it does stay open after 10pm on the weekends and 9pm weekdays.
Another option is to see the rare birds and endemic animals of New Zealand at Kiwi Park. The park is located near the gondola and costs $60. You can go and see some of the parks North Island Brown Kiwi in their nocturnal enclosure. It’s a really cool experience and the keepers tell you loads of interesting facts about the kiwis and are around to answer any questions. No photos are allowed in the enclosure and you need to keep quiet to not disturb the birds. However, this was the one opportunity I had to see a kiwi and was really happy with the experience. They do lots of conservation work which the money all goes towards. The park also has lots of other animals including the Tuatara who belong to their own ancient family of reptile called Sphenodontia, dating back to over 220 million years ago and are only found in New Zealand.
Travel to Te Anau on day 17
Queenstown to Te Anau-> 2hrs
If you have time on the way to Te Anau do the 3hr Wye Creek hike for amazing views of Lake Wakatipu. This is one of the weirdest hikes I have done because you walk on a pipeline from the dam at the end of the hike. You can carry on past the waterfall after the pipeline to a cavelike rock structure that has even better views than the pad above the waterfall. This area is very popular with climbers so be careful you don’t walk underneath one of them.


Days 17 – 19: Te Anau
The main thing you’ll want to do here is the famous Milford Sound Cruise. On the way to the cruise there are loads of things to do on the road there.
- Stop off at Eglinton Valley for a quick lookout spot
- Mirror Lakes is a beautiful lake with reflections of the mountains on it
- Key Summit is a 3hr return hike and the views are spectacular, if you have the time I definitely recommend in good weather
- Pop’s View Lookout is a great photo opportunity of the hanging valley and surrounding mountains
- Lake Marian is a 3hr return hike to another gorgeous reflection lake, there are a couple of nice cascade waterfalls (Marian Falls) on the track very early on which some people do as just a short return walk – this track should only be attempted in good weather or for experienced hikers
- Falls Creek is a beautiful road-side glacial waterfall and the colours are insane
- Monkey Creek is another glacial river and a good spot for seeing some glaciers on the side/ top of mountains
- Gertrude Saddle is a 4-6hr amazing hike which I really wanted to do but it is advised to only be attempted by experienced hikers and in good weather. Unfortunately it was raining when I went so will have to do this hike next time I visit!
Take the whole day to really soak in this amazing trip to Milford Sounds and experience a truly magical part of New Zealand.
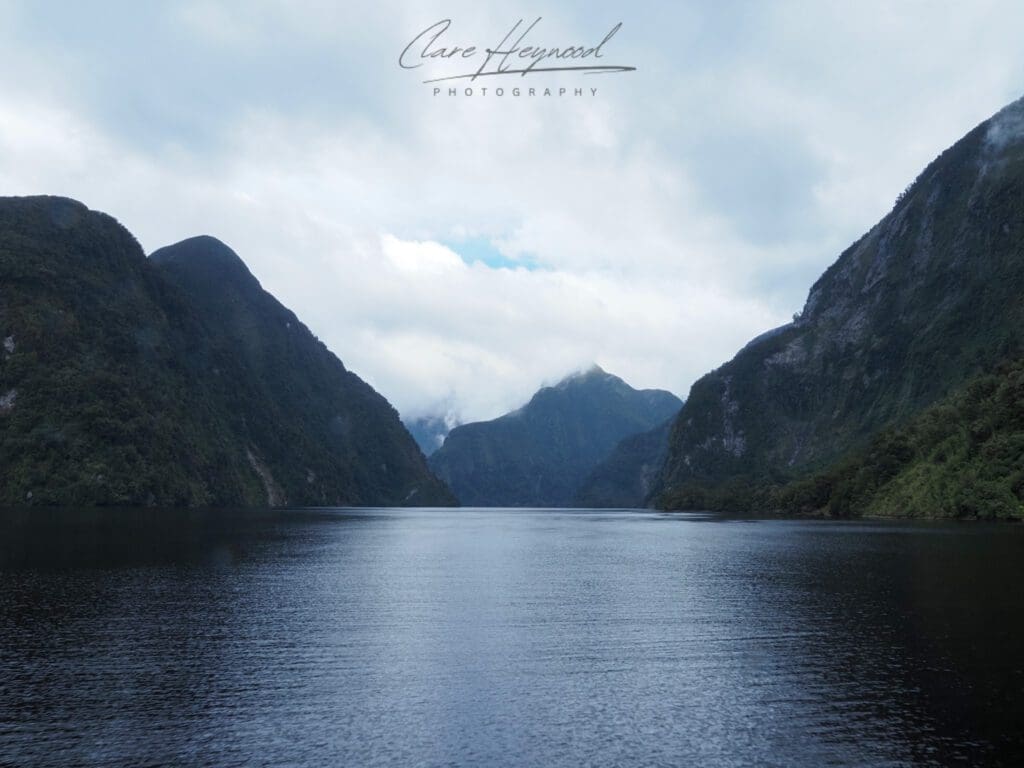
If you want a quieter and more exclusive trip to a fjord (yes Milford Sounds is actually a fjord not a sound) check out Doubtful Sounds. The one thing I loved about this experience was that the captain shut the engines off and we got to experience this amazing place the way it’s meant to be, just the sounds of the waterfalls, bird songs and wind. In fact the Māori name for this place is Patea, which means place of silence, and you truly got a sense of that here.
Travel to Catlins National Park in the late morning of day 19
Te Anau to Catlins National Park (Curio Bay) -> 3hrs
Not many people travel to the Catlins, personally I didn’t think the scenery was as beautiful as the rest of South Island as you leave the mountains but the wildlife you can see is insane! I am glad I went just for that, I will mention what I saw and where later on. If this isn’t your thing though, fell free to spend longer in Wānaka or Queenstown before heading to Mt Cook National Park.
En route to Curio Bay, I recommend stopping off at Fortose Bay for a quick coastal view, the last part of this road is unsealed but it wasn’t too bad.
Another stop is Waipapa Point where there is a lighthouse with an amazing view of the coastline. There are occasionally Sea Lions on the beach below the lighthouse but they can be aggressive if provoked so keep your distance.
Stop off at Slope Point for the southern most point of mainland New Zealand where there’s nothing between you and Antartica and breath in some of the freshest air you will find anywhere.
Once you reach Curio Bay, if you have arrived at low tide, you will be able to see the petrified forrest. This place is pretty cool to explore as the coastline is made up of the fossilised remains of an ancient forrest. Keep your eyes peeled for the endangered yellow-eyes penguins and keep your distance if you do see them.
If you have time today, go to Porpoise Bay for a chance to see Hector dolphins playing in the sea and surfing the waves. I spent ages watching them jumping out of the water and putting on a show for us!


Days 19 – 22: Catlins National Park
Day 20: Curio Bay to Kaka Point
After exploring Curio Bay and saying goodbye to the dolphins its time to explore the waterfalls of the Catlins. There’s quite a lot of stops to do in the Catlins so this section will be a bit long but I’ll try and make it make sense.
The first one you’ll drive past is Koropuku Falls which is a 20min return walk through a rainforest, this waterfall is quite hard to find and parking is just on the side of the road. Its super quite along that road though, and I was the only person at the waterfalls when I went in the morning. I really liked the peace of this waterfall and thought it was very pretty.
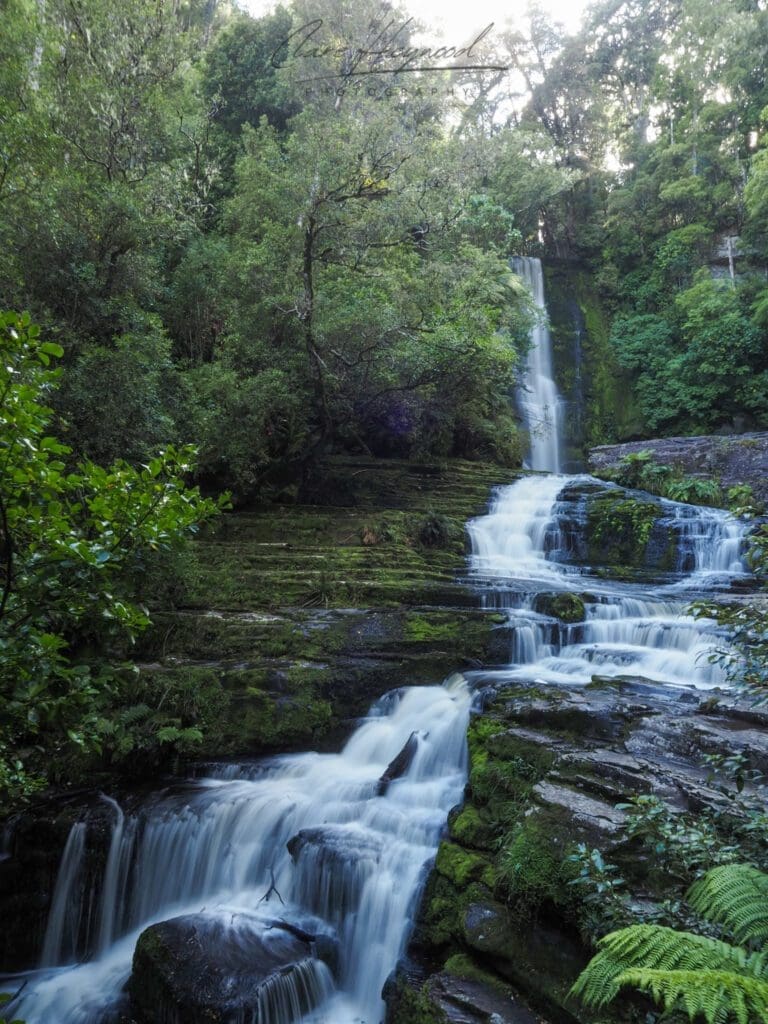
Next, you’ll find the beautiful and more well known McLean Falls. This is a 40min return walk with a designated parking area and toilet facilities. The walk takes you through native bush until you get to the falls and I highly recommend stopping here.
This next stop isn’t a waterfall but is worth stopping at: Cathedral Caves. Located at the northern end of Waipati Beach, these caves are two sea-formed passages that measure a combined length of 200 metres and a height of up to 30 metres. You walk through Māori owned land that is maintained by a trust and so have to pay $15 for entry, includes parking and toilet facilities. These caves were definitely a highlight of the Catlins! Only open in the summer months so check before you go and opening times depend on the tide.
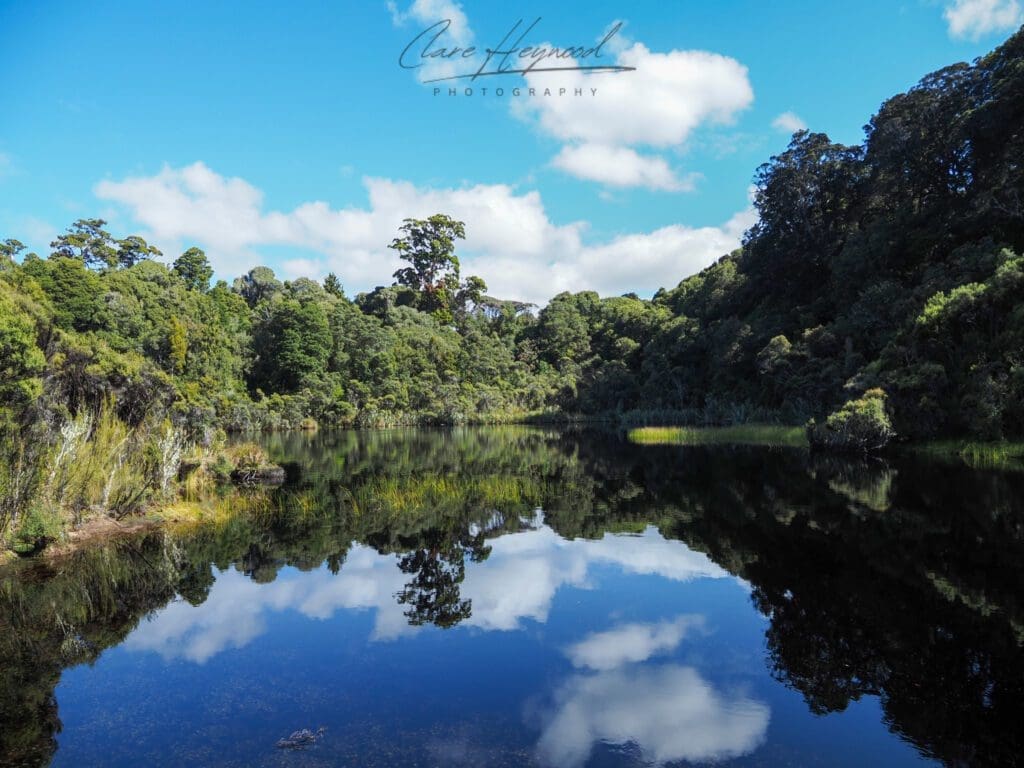
If you want another short walk, Lake Wilkie Track is a nice mirror lake loop walk that takes about 15mins return. The walk is through native bush and lots of different wildlife can be found in or around the lake.
Florence Hill Lookout is a stunning roadside stop that overlooks Tautuku Beach but I hightly recommend stopping here as the view is gorgeous!
On the way to the next stop is an art gallery called The Lost Gypsy Gallery that is very popular with people doing this road-trip. Unfortunately, it was closed when I went through but is worth stopping at if it’s open. A good place for food or coffee is Peake’s Kitchen next to Papatowai DOC Camp. I had an amazing burger and chips from here and was exactly what I needed after exploring all the wonders of this road-trip.
And, we’re back to waterfalls, these ones are Matai Falls and Horseshoe Falls. You can see both of these from the same 40mins return track. These weren’t the most impressive falls but worth a stop if you have time.
The last waterfall on this stretch is Purakaunui Falls which is a 20min return walk to a well-known but beautiful waterfall.
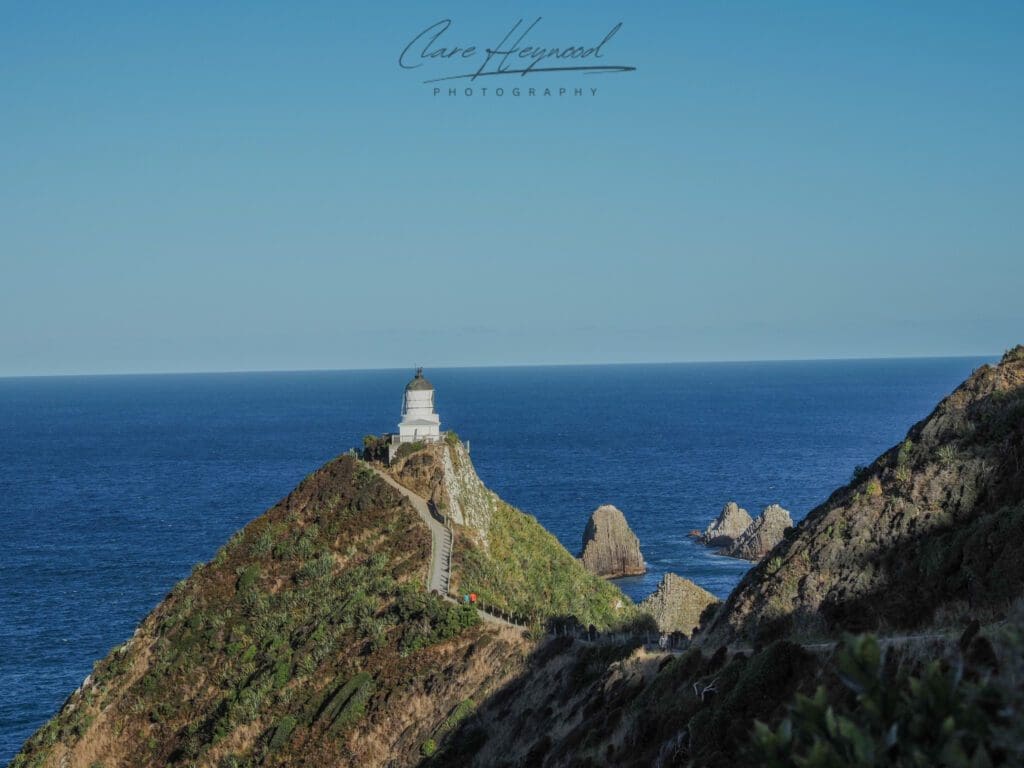
Lastly, stop off at Surat Bay for a chance to see Sea Lions resting on the beach at low tide. Or drive to Nugget Point and you’ll see Sea Lions on the drive at dusk, there is chance they might be on the road so be careful. The walk up the lighthouse and the lookout point overlooking the Nuggets is stunning. You may see NZ Fur Seals swimming in the sea below or resting on the rocks. There’s also a bird hide called Roaring Bay Penguins & Seals Observatory which is a good opportunity to see the rare yellow-eyes penguins or the little blue penguins.
Day 21: Kaka Point to Oamaru
If you didn’t go to Nugget Point yesterday, check it out today before heading to Oamaru.
Tunnel Beach is meant to be a great place to stop, with amazing views of the coastline and a hand carved tunnel that leads you to a secluded beach. However, when I went it was temporarily closed but I watched the surfers on Blackhead Surfing Beach instead while I planned my next stop. I opted for driving down Brighton Road and there are tons of parking areas for the gorgeous white sand beach that stretches along that road.
I then headed up to Shag Point Lookout which is very popular with the NZ Fur Seals, there were loads sunbathing on the rocks when I went and you are relatively close to them from the headlands.There were a couple of pups there too who were so adorable.
From there go to Katiki Point Lighthouse, which is a short 30mins return walk with the chance to see more Sea Lions, NZ Fur Seals and yellow-eyes penguins.
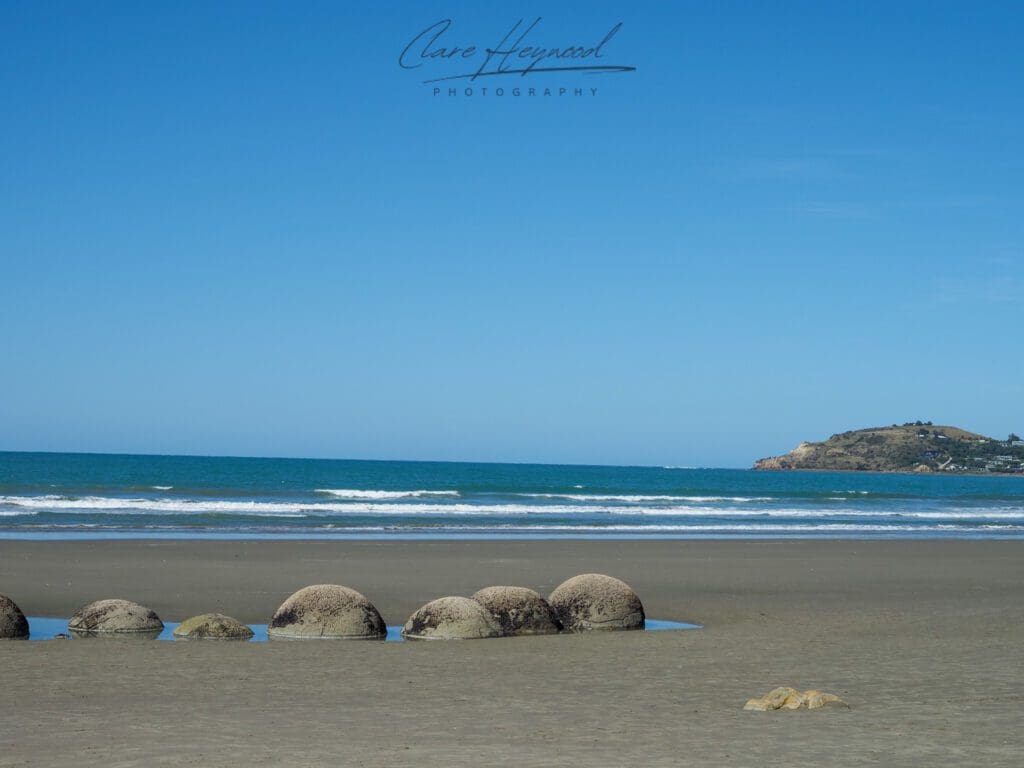
Lastly, stop at Moeraki Boulders Beach, which is famous for its spherical stones scattered across a beach and is best seen at low tide. It was really cool but I thought it was a little disappointing, there weren’t that many boulders and they are just on one section of the beach. If you are driving past them though, it is worth a small stop to see them because they are quite cool.
When you arrive in Oamaru there is the option to see the Little Blue Penguin Colony. It’s an interesting experience as you sit in grand stands and watch the penguins come home to their burrows from fishing in the sea all day. I felt like they were about to burst into song or something. It was quite expensive for what it was at $45, but this might be your only occasion to see them so will be worth it. The company does a lot of conservation work for the penguins so the money goes back to the penguins in that sense.
Travel to Lake Tekapo/ Twizel on day 22
Oamaru to Lake Tekapo -> 2hrs 20mins
Oamaru to Twizel -> 1hr 40mins
Mount Cook is incredibly expensive to stay in, so I would recommend staying in either Twizel or Lake Tekapo. I stayed in Lake Tekapo as I wanted to go there anyway and it makes the drive to Akaroa shorter when it comes to leaving Mt Cook National Park.
The main stop between Oamaru and either Lake Tekapo/ Twizel is Elephant Rocks. These are a collection of large limestone rocks that used to be part of the sea floor and have been eroded over time from the weather. It was the film set of the first Narnia film.


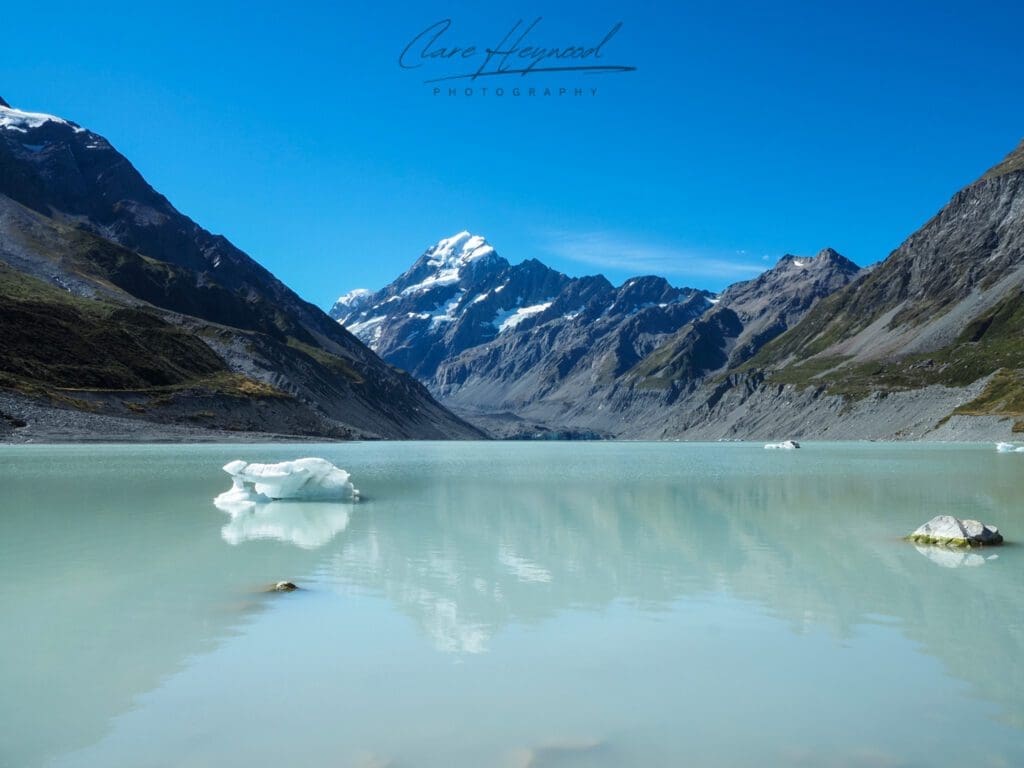
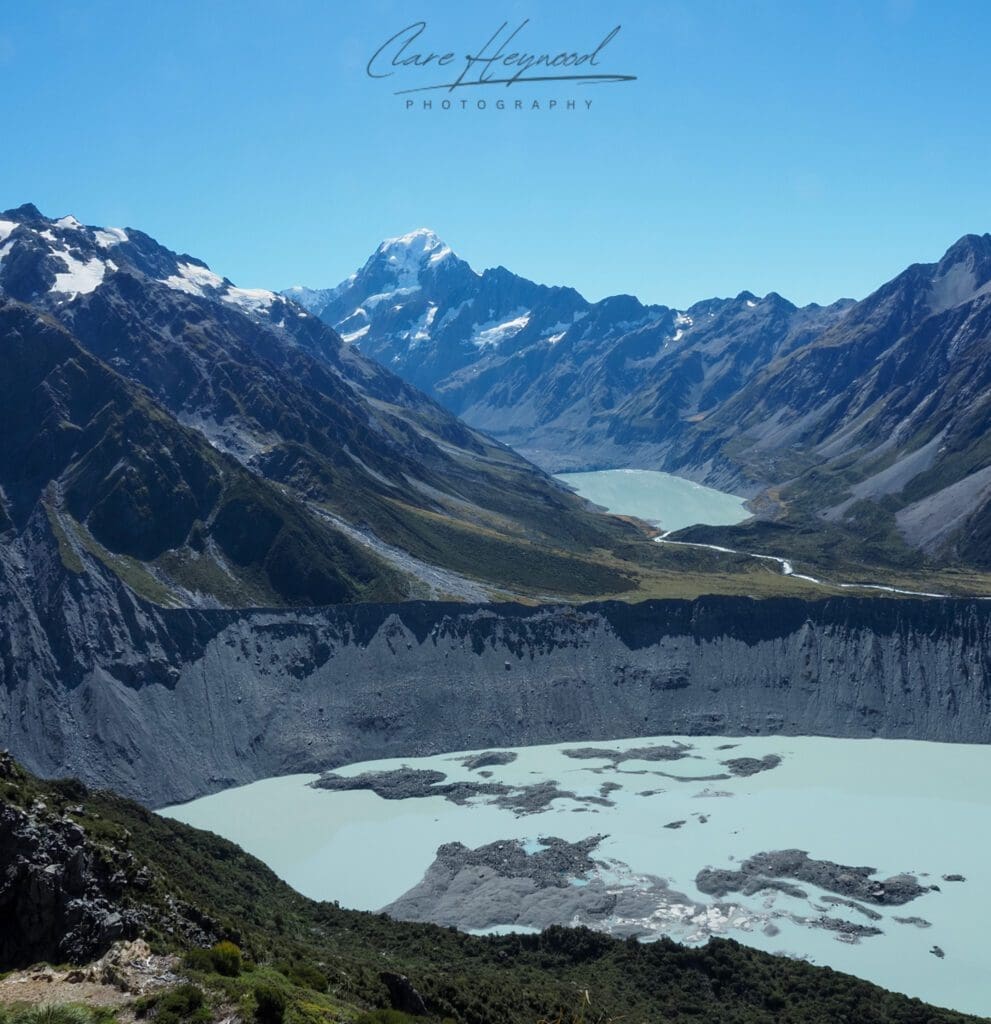
Days 22 – 24: Mount Cook National Park
This was my favourite national park in the whole of New Zealand! This place is stunning and is home to two of my top 5 hikes in New Zealand. I was blown away by every aspect of Mount Cook, including the accommodation prices.
The first thing you will notice is the gorgeous bright blue glacial lake that is Lake Pukaki and has Mount Cook as its background. There is a nice lookout spot called Tapataia Mahaka Peter’s Lookout on google maps which has amazing views of the lake and Mount Cook.
The drive to White Horse Hill Campground (the car park for the famous Hooker Valley walk) is one of the most scenic drives, you follow Mount Cook the whole way up and there are a couple of glaciers to see by the road-side.
Once you get to the car park there are two hikes I really recommend you do. The first is Hooker Valley which is a 3hr return walk and the route is relatively flat and suitable for the whole family. Don’t be fooled though, the views are incredible and once you get past the 3rd swing bridge the landscape opens out onto Hooker Lake. This is a beautiful greeny-grey colour and you get amazing views of Mount Cook and the glacier at the top of the lake. On hot days, ice-bergs can break off from the glacier and are flouting in the lake.
Another incredible hike, but a lot harder than the hooker valley track is Sealy Tarns. This hike is referred to as the stairway to heaven on the DOC website due to the whopping 2,200 stair you have to climb to get to the top and usually takes between 3-4hrs return. There is very little shade here so make sure you bring suncream and a hat. Once you get to the top, you are rewarded with unbeatable views of Mueller Lake, Hooker Lake and Mount Cook, you also get an insane view of Mueller Glacier. If you are up for the challenge and the weather is good, you won’t regret the gruelling hike to the tarn.
Down the Tasman Valley Road is the less busy Tasman Glacier Viewpoint, which is the other side of Mount Cook but just as stunning.
The car parks to both these places fill up quickly so don’t be surprised to see cars parked down the side of the road. But trust me, you don’t want to miss this place!
If you are staying in Twizel, make sure you check out Lake Tekapo at some point, the lake is really beautiful and is a dark sky reserve so loads of star gazing tours operate here. Mt John Summit Circuit Track is a great way to see Lake Tekapo and is a 3hr return walk from the lakeshore. The Church of the Good Shepard is probably the most photographed church in the world, due to its amazing location by the lake surrounded by mountains.
Travel to Akaroa on day 24
Lake Tekapo to Akaroa -> 3hrs 40mins
Twizel to Akaroa -> 4hrs 20mins
To break up the journey I stopped off at Geraldine Farmshop & Cafe for a coffee and some food.


Days 24 – 25: Akaroa
I didn’t get a chance to visit Akaroa but I really wanted to! It is an interesting town as it has French heritage and so is a little European town in the middle of New Zealand. It helps it’s surrounded by gorgeous bays and hills to hike to give you amazing views. Consider driving down Summit Road when you arrive for incredible views of the harbour. There’s also plenty of sea life to see here including Hector dolphins and the largest colony of Little Penguins in New Zealand.
There is so much to do around here I have included a link to the official tourism website here.
Travel to Kaikōura on day 25
Akaroa to Kaikōura -> 3hrs 40mins
There are many small towns on this route which are good spots for food or coffee.
Days 25 – 27: Kaikōura
Kaikōura is the best place in New Zealand to see whales and dolphins. They operate loads of whale boat cruises and flights to see the whales from above. You can also go kayaking in the sea to see Dusky dolphins up close and watch them play underneath your kayak. Not to mention that the scenery around Kaikōura is also stunning. When I visited I did the Kaikōura Peninsula walk which took a couple of hours to complete but was so beautiful. There’s a chance you’ll get to see some more NZ Fur Seals sunbathing on the beaches on this walk.
Travel to Christchurch on day 27
Kaikōura to Christchurch -> 2hrs 20mins
You’ll be travelling down the same road you took to get here so if you found a cute café be sure to stop off there again!


Days 28: Christchurch
I didn’t spend too much time in Christchurch but from the little I did see, it was my favourite city in New Zealand. I took an e-scooter around the city centre and walked around the Royal Botanical Gardens. It’s also in the perfect place for another day trip to Arthur’s Pass if you wanted one more look at the mountains before your trip home. As Christchurch sits on a tectonic line, there is occasionally earthquakes that hit and destroy quite a lot of its infrastructure. Therefore, the condition you may find this city in can change quite a lot. When I went there was still quite a lot of construction happening from the most recent earthquake.
You’ve now reached the end of what I hope has been an unforgettable experience! If you haven’t been to North Island yet or can’t get enough of New Zealand, check out my North Island Itineraries (links at the top of the page).

Other Options
If you didn’t take the ferry across from North Island, this itinerary works well whichever location you start off at.
New Zealand. New Zealand. New Zealand. New Zealand. New Zealand. New Zealand. New Zealand. New Zealand. New Zealand. New Zealand. New Zealand. New Zealand. New Zealand. New Zealand. New Zealand. New Zealand. New Zealand. New Zealand.
Got More Time – Check Out These Places:
- Stewart Island – a small island off the south coast of New Zealand which is a must for wildlife lovers and has recently been awarded dark sky status
New Zealand. New Zealand. New Zealand. New Zealand. New Zealand. New Zealand. New Zealand. New Zealand. New Zealand. New Zealand. New Zealand. New Zealand. New Zealand. New Zealand. New Zealand. New Zealand. New Zealand. New Zealand. New Zealand. New Zealand. New Zealand. New Zealand. New Zealand. New Zealand. New Zealand. New Zealand. New Zealand. New Zealand. New Zealand. New Zealand. New Zealand. New Zealand. New Zealand. New Zealand. New Zealand. New Zealand. New Zealand. New Zealand. New Zealand. New Zealand. New Zealand. New Zealand. New Zealand. New Zealand. New Zealand.
South Island. South Island. South Island. South Island. South Island. South Island. South Island. South Island. South Island. South Island. South Island. South Island. South Island. South Island. South Island. South Island. South Island. South Island. South Island. South Island. South Island. South Island. South Island. South Island. South Island. South Island. South Island. South Island. South Island. South Island. South Island. South Island. South Island. South Island. South Island. South Island. South Island. South Island. South Island. South Island. South Island. South Island. South Island. South Island. South Island. South Island. South Island. South Island. South Island. South Island. South Island. South Island. South Island. South Island. South Island. South Island. South Island. South Island. South Island. South Island. South Island. South Island. South Island. South Island. South Island. South Island. South Island. South Island. South Island. South Island. South Island. South Island. South Island. South Island. South Island. South Island. South Island. South Island. South Island. South Island. South Island. South Island. South Island. South Island. 4 week. 4 week. 4 week. 4 week. 4 week. 4 week. 4 week. 4 week. 4 week. 4 week. 4 week. 4 week.
